How Lace / Eyelet pattern work on a Brother Knitting Machine
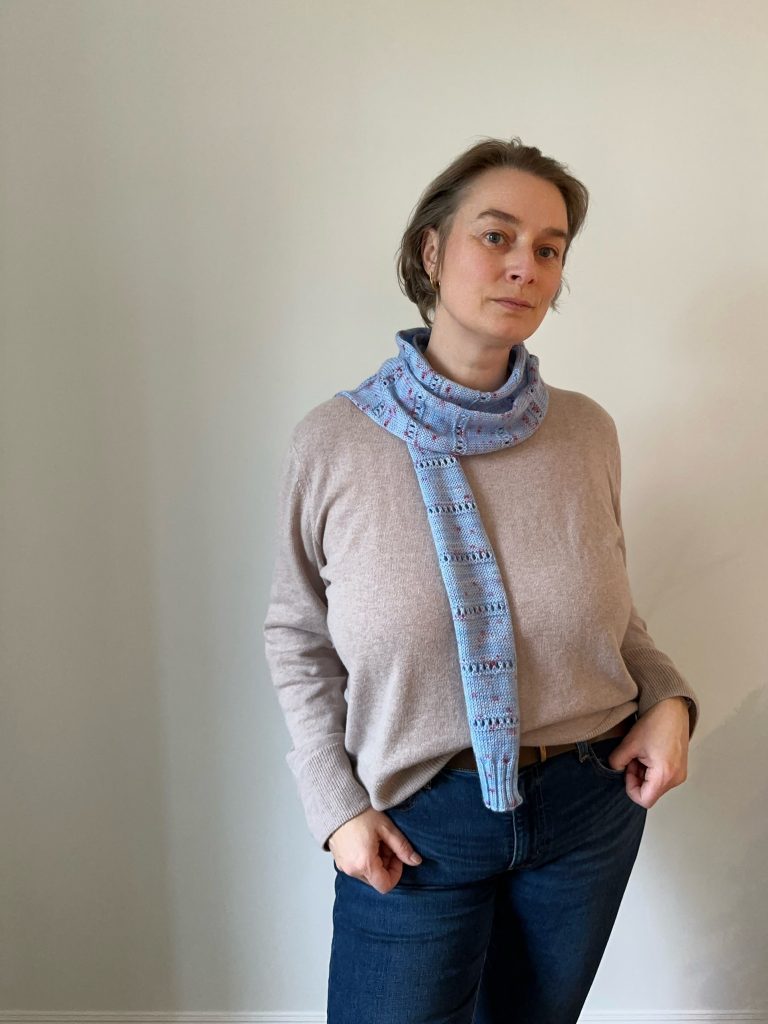
🇬🇧 2024 is still young, so I guess you all still remember the Building Block Blanket KnitAlong from last year. What I missed to tell was, that I had the honor to design one of the squares for the Blanket. I designed the letter “G” block!
At the time I was about to design the letter I noticed, that there was no lace / eyelet pattern in the blanket yet, and I thought I would like to have this technique shown in the blanket, too. At least for me, the KnitAlong was a big opportunity to learn all kind of knitting machine technologies. And I was already wondering for a while how the machine is knitting lace from a punch card and why the lace punch cards have so many blank rows. Designing a letter square gave me the opportunity to investigate this.
Summary
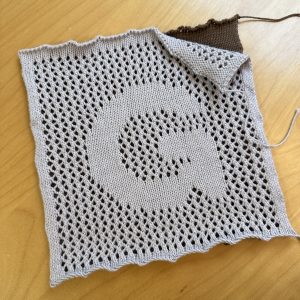
The basic idea of the square for the blanket is to have a solid letter in stocking stitch that is surrounded by an airy lace pattern. This lace square is later placed on top of a solid stocking stitch square in a contrasting color that will peak through the eyelets. This will make the lace more visible and avoid any holes in the final blanket. The two blocks could later be attached to all the other blocks just as one, seaming the edges together. I chose a net-like eyelet lace pattern to have a large difference in texture between the letter and the surrounding lace pattern.
I wanted the design to be knit-able also for people with a pure mechanical knitting machine not using DesingAKnit (DAK) – like me. Therefore, I did not (and could not) design anything using DAK but chose the standard Brother punch card (J17) for the eyelet lace background. The stocking stitch part of the letter did not need much planning except charting out the outline of the letter G matching the size of my squares. To have a nice, smooth edge of the overall block for seaming, I planned 4 rows at the top and bottom and 4 stitches on both sides in stocking stitch (using L-Point Cams). After the 4 initial rows of stocking stitch and some rows of eyelet background, I worked the letter G according to the chart such, that I moved the lace carriage for the needle selection and then manually pushed those needles back in to normal knitting position (B) that were part of the letter G before the next move of the lace carriage that would transfer the stitches and produce the eyelets – I will describe that in more detail below. After I reached the top of the letter, I continued with some more rows of plain eyelet lace pattern before I finished with 4 rows of stocking stitch.
How the Brother knitting machine is working lace / eyelet pattern
Since the first lace experiments I was curious how the lace is done on the machine. I am (was) mainly a hand knitter and I struggled to understand all the blank rows on the punch cards and the many movements of the lace carriage when it seems that there is not so much happening.
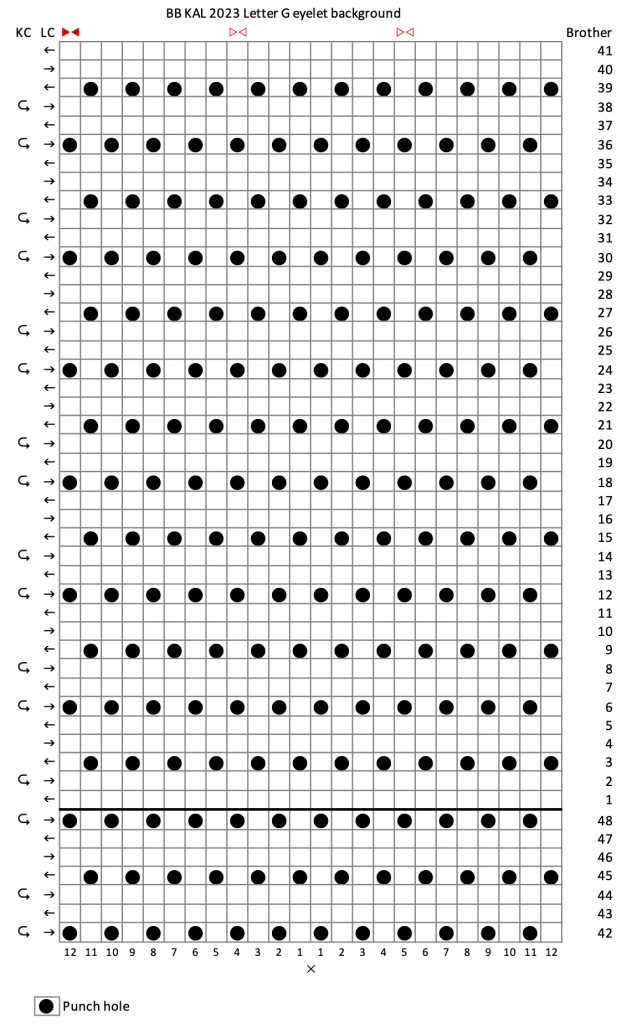
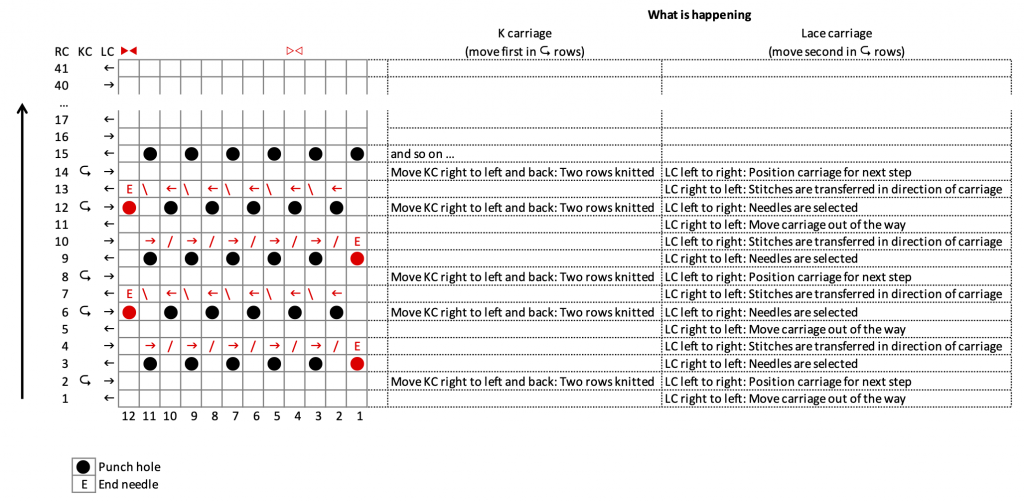
This is the punch card for the eyelet lace I chose. It is the lace punch card no. 17 from the Brother J-set (therefore the Brother numbering).
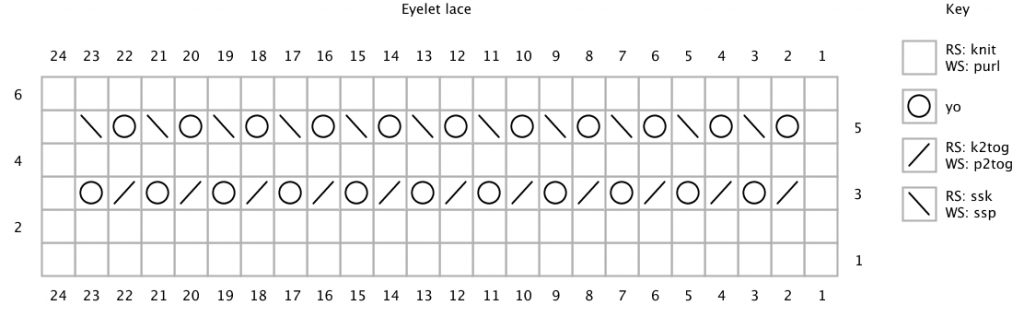
These are the first rows of the same pattern charted for hand knitting, starting with row 1.
There were two main differences that irritated me when starting to do lace on the machine. Obviously, the punched holes are indicating the position of the eyelets. But why are there more blank rows between the punched rows compared to the rows between the yarn overs in the hand knitted chart? And second, how is the machine determining if a stitch is knitted together with its left or the right neighboring stitch? The answer to both questions was rather simple: I can do much more in one row knitting by hand than the machine can do. In hand knitting, knitting two stitches together in either direction and doing a yarn over can be done in one single row. But they have to be put in separate steps for the machine which is resulting in several carriage movements and therefore rows on the punch card. And here is how:
There are two carriages are used to knit lace on the knitting machine. The K carriage (KC) will knit the stitches and therefore increase the row counter. The lace carriage (LC) will manipulate the needles and stitches and therefore push the punch card forward. In most lace pattern, the lace carriage is moved more often than the K carriage. For this reason, the row counter is often not aligned with the row number on the punch card. The row counter will show the actually knitted rows while the row number on the punch card will show where you are in the sequence of steps to knit the lace pattern. That can be highly confusing.
The punch cards meant for lace are indicating which carriage to move when. On the left side, the ← and → arrows are indicating the direction the lace carriage should be moved while the ↪ arrows indicating when the K carriage should be moved. The lace carriage is normally doing one pass at the time in one direction. The K carriage is always moved in two passes, forth and back (right to left and back). When there are both arrows in one row, the K carriage is moved first forth and back, and the lace carriage is moved afterwards. Let’s see how the pattern of the punch card is knitted. I will show only half of the stitches and the row numbers I am referring to will be the numbers of the punch card. In addition, I will split the rows indicating a K and L carriage movement in two separate rows in the charts while they are normally shown in one row (for example, compare row 2 in the picture of the full punch card above).
At the beginning of the lace knitting both carriages should be on the right side (please, refer to your manual how to setup lace).

In row 1 the L carriage is moved out of the way. In row 2 the K carriage is used to knit two rows (one forth and one back); This means, that the lace pattern is starting with two plain rows at the bottom. I guess this should prevent you from making eyelets without having any knitted rows below. I took this into account when I knitted my first 4 rows in stocking stitch.
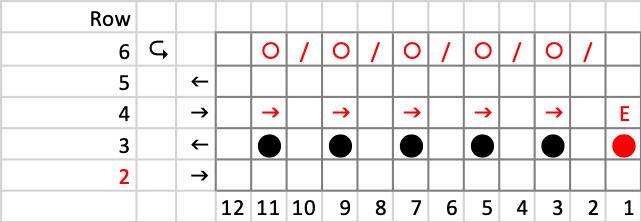
During the movement of the K carriage the punch card is not moved. It is still on row 2 because the punch card is only moved one row further by the L carriage. Still in row 2, the sequence of movements of the L carriage will be started. They are purely done to manipulate the needles and stitches for the first row of eyelets. See the chart above:
- In row 2, the L carriage is moved to the right.
- In row 3, the first row with punched hole, the L carriage is moved to the left and the needles indicated by the punched holes will be selected. The stitches are still staying on the needles.
- In row 4, when the L carriage is moved to the right the stitches on the selected needles will be transferred to the neighboring needle in the direction of the carriage movement (hence to the right). The end needle should always be knitted and not used for eyelets (indicated in red). After row 4, the stitches and needles are prepared to be knitted. Needles that hold two stitches alternate with needles without a stitch. An eyelet is generated by a yarn over on every empty needle when the next row is knitted.
- Next step would be to knit the row. But the L carriage is in the way to move the K carriage.Therefore, the L carriage is moved to the left and out of the way in row 5, before in row 6 the K carriage is finally knitting the stitches. In the first row of the K carriage the yarn overs are generated and the stacked stitches are knitted together. The second row of the K carriage is adding a plain knitted row between the eyelet rows; just as in the hand knit chart.
This means, for this particular row of eyelets the knitting machine needs 5 steps (four L carriage movements and one K carriage movement) to do the same that can be done in one row of a hand knitting! The machine is needing so many steps because the L carriage is always slipping the stitches in the movement direction. If we want to knit two stitches together as “right leaning decrease”(k2tog in hand knitting) the movement of the L carriage has to be from left to right. This is leading to extra L carriage movements to 1. have the moving direction correct when the stitches are slipped and to 2. move the L carriage out of the way to use the K carriage afterwards.
The machine needs less steps to perform the same eyelet pattern with “left leaning decreases” (ssk in hand knitting), as done in rows six to eight.

After the movement of the K carriage the punch card is still on row 6 because the punch card is only pushed by the L carriage. Still in row 6, the next sequence of movements with the L carriage will be started to manipulate the needles and stitches for the next row of eyelets.
- In row 6, the L carriage is moved to the right and the needles will be selected. The stitches are still staying on the needles.
- In row 7, when the L carriage is moved to the left the stitches on the selected needles will be transferred to the neighboring needle in movement direction of the carriage (hence to the left). The stitches and needles are prepared to be knitted.
- In this case, the L carriage is on the left side and already out of the way and the K carriage can immediately be used in row 8 to knit the stitches.
For this particular row of eyelets, the knitting machine needs only three steps (two of the L carriage to select the needles and manipulate the stitches, and one of the K carriage to actually knit the stitches).
From row 8 onwards, the pattern is now repeated continuously (row 8 is like row 2), alternating right and left leaning eyelets to create a net-like eyelet lace.
Here is a summary of the discussed steps:
Designing the square layout
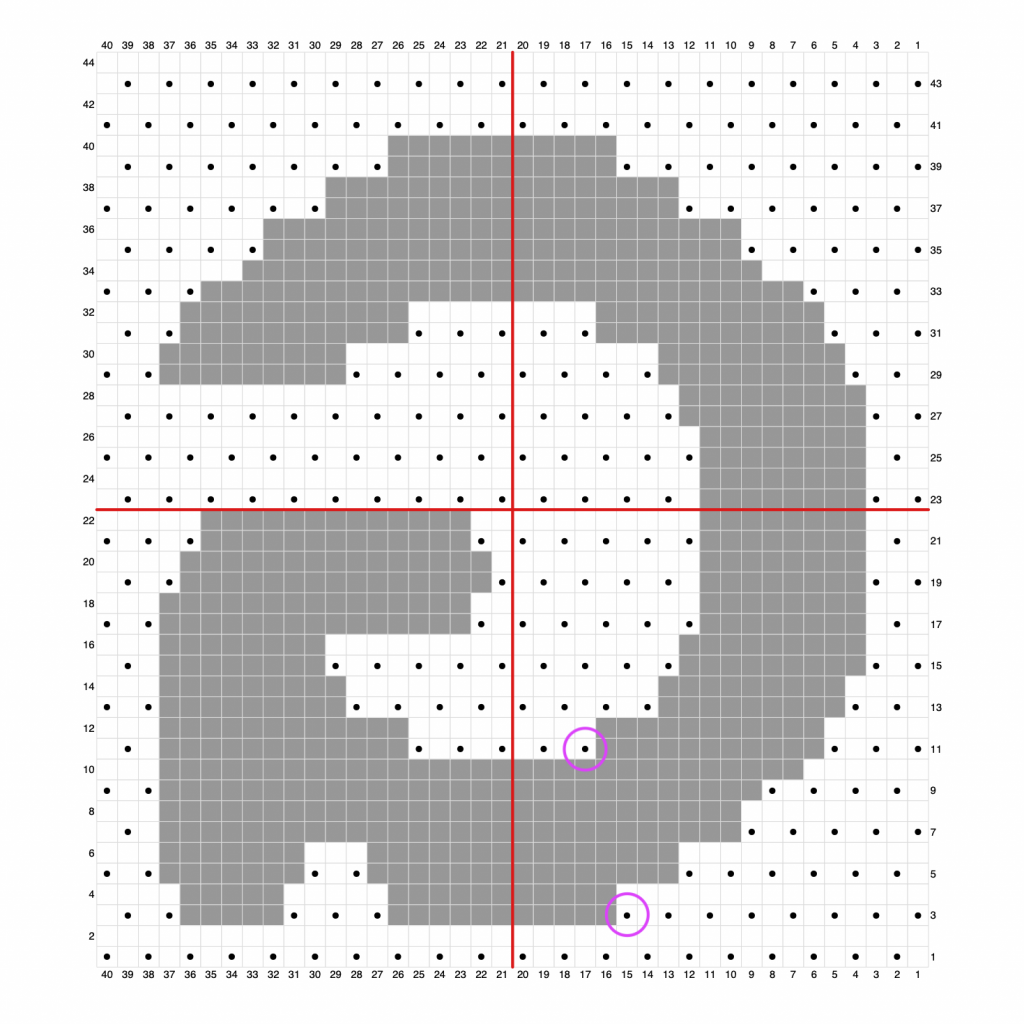
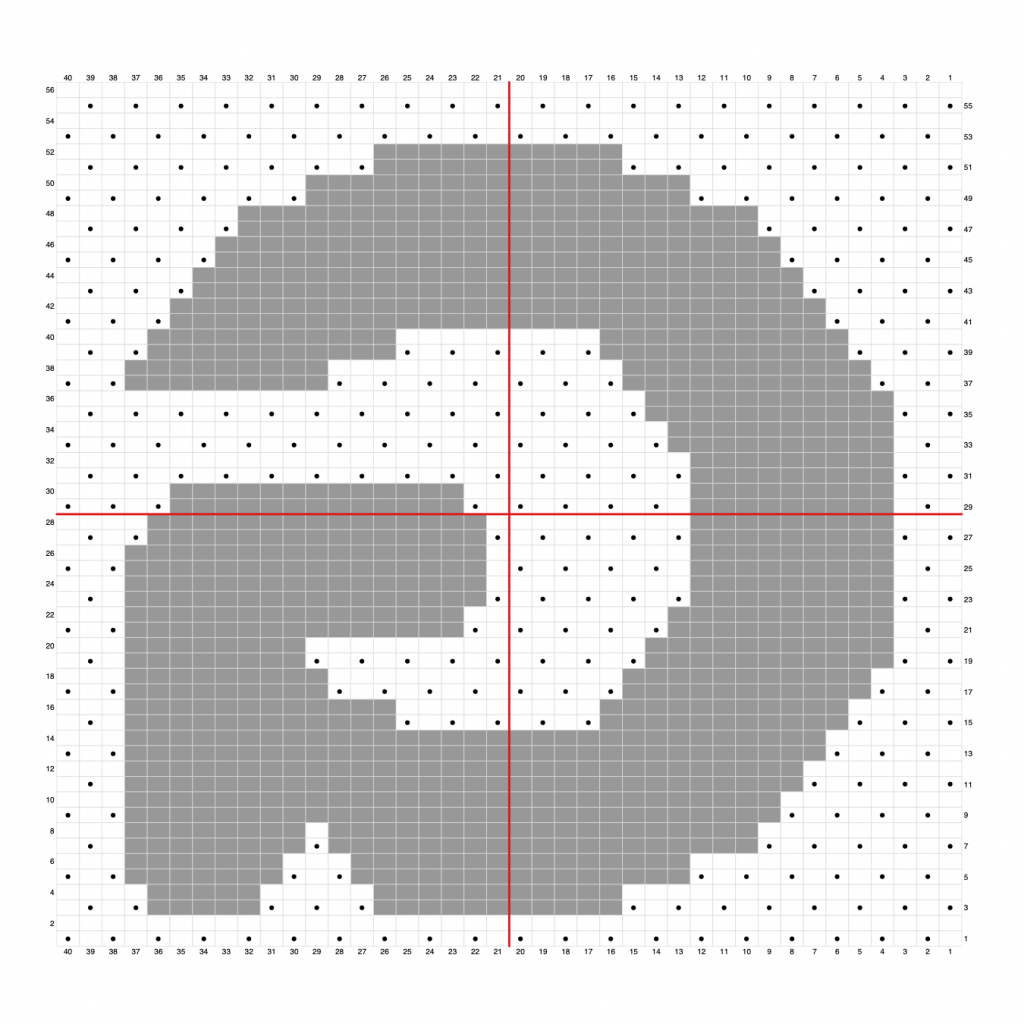
For the chart of the letter, I just outlined a letter G matching the size of my square. When designing the letter G for my square I did consider some things:
- If you chart a letter on normal squared paper (left / first chart), the letter might be stretched depending on the ration of stitches to rows when knitted. I used stitchfiddle.com to chart my letter, because it can take the gauge into account and is stretching the chart (right / second chart).
- With lace knitting, there will be always two knitted rows. Planning the outline of the letter with changes in every row will therefore not work.
- To have a clear outline, it is important to have the eyelets places along the edge of the letter. Otherwise the knitted stitches between the eyelets might blur the outline of the letter a bit. This is not always possible but it is especially important when planning changes for curves. I included the eyelets in the chart as black dots and marked two examples in the left chart below were the eyelets were placed along the outline of the letter.
- The letter needs to be mirrored because the user is normally looking at the wrong side of the knitting while it is hanging on the knitting machine.
- It might be wise to have a gauge swatch for the lace pattern. My first try of the lace letter got wider that the plain stocking square and was not fitting nicely on top of the background square.
Knitting the square
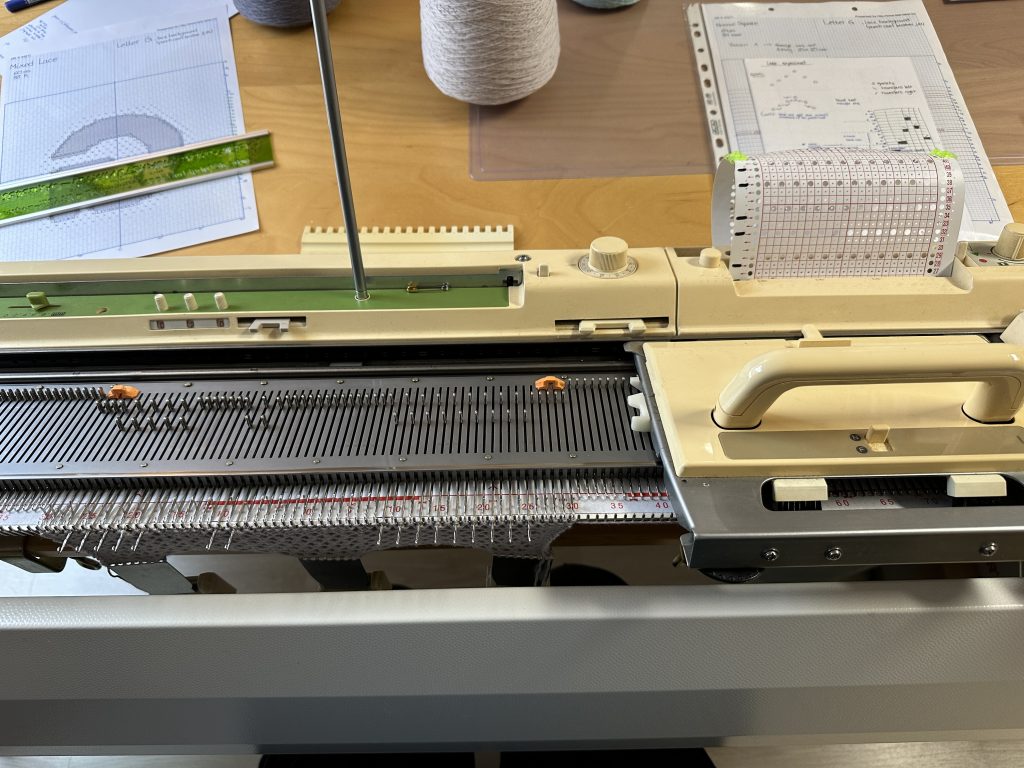
Once I charted my letter knitted the lace square. Here is what I did using a punch card machine. I cannot provide information how it would work with DAK or on machines not being fabricated by Brother. As I heard from knitting friends, there are quite some differences! I will have some words on hand manipulation later, for all that do not have a punch card machine. The steps were:
- E-wrap cast on.
- Working two rows in stocking stitch taking into account that the lace pattern is starting with two plain rows.
- Preparing the machine for lace (check your manual) and adding 4 needle wide L-Point Cams at the left and right edges. The L-Point Cams will prevent the needles to be pushed out and therefore guarantee a smooth stocking edge of 4 stitches.
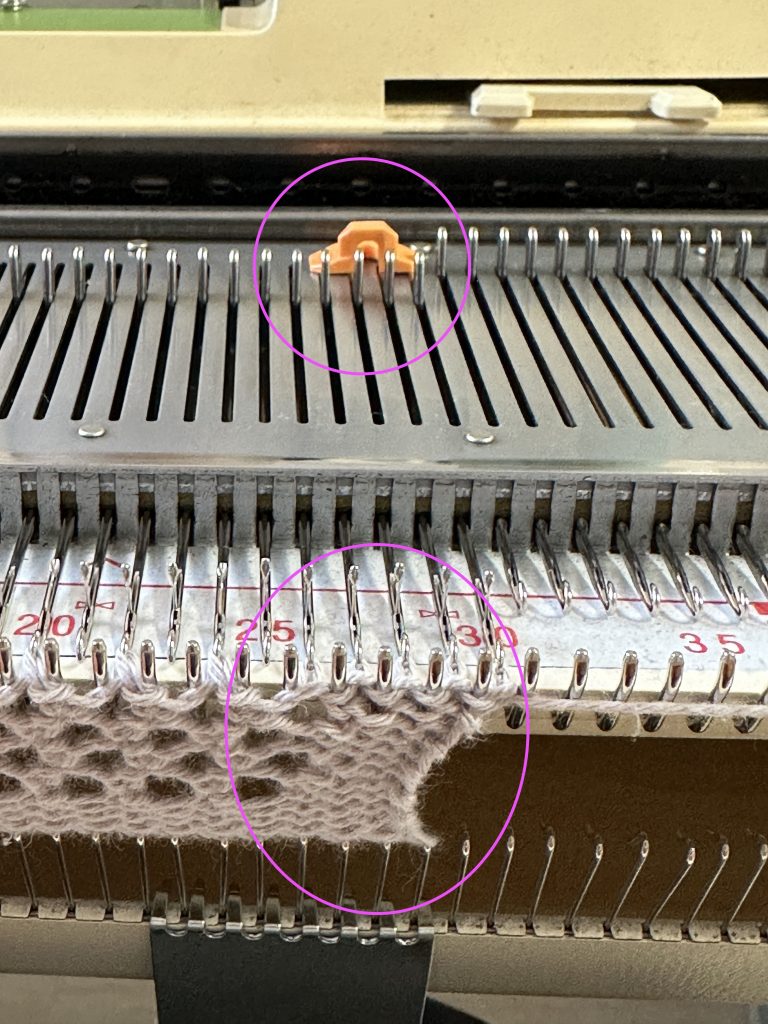
- Working in lace pattern until I reached the start of the letter.
- Going on with lace knitting but pushing back all needles in to normal knitting position (B) that were part of the letter G after I moved the lace carriage for the needle selection and before the next move of the lace carriage that would transfer the stitches and produce the eyelets. By doing so, I was creating the eyelet pattern for the background and stocking stitch for the letter G.
- After I reached the top of the letter I continued in lace pattern until there were only 4 more rows left. The last 4 rows I worked in stocking stitch.
- Bind-off behind the studs.
When I was working my lace square I got the impression that my machine was very sensitive to the tension of the yarn and the weights on the knitting. Too little and especially too much weight was leading to dropped stitches. The photo below is showing a dropped stitch that should have been placed on the needle right from it. I checked every row directly after moving the L carriage and placed dropped stitches back. In most cases the stitch is still relatively easy to hook up.
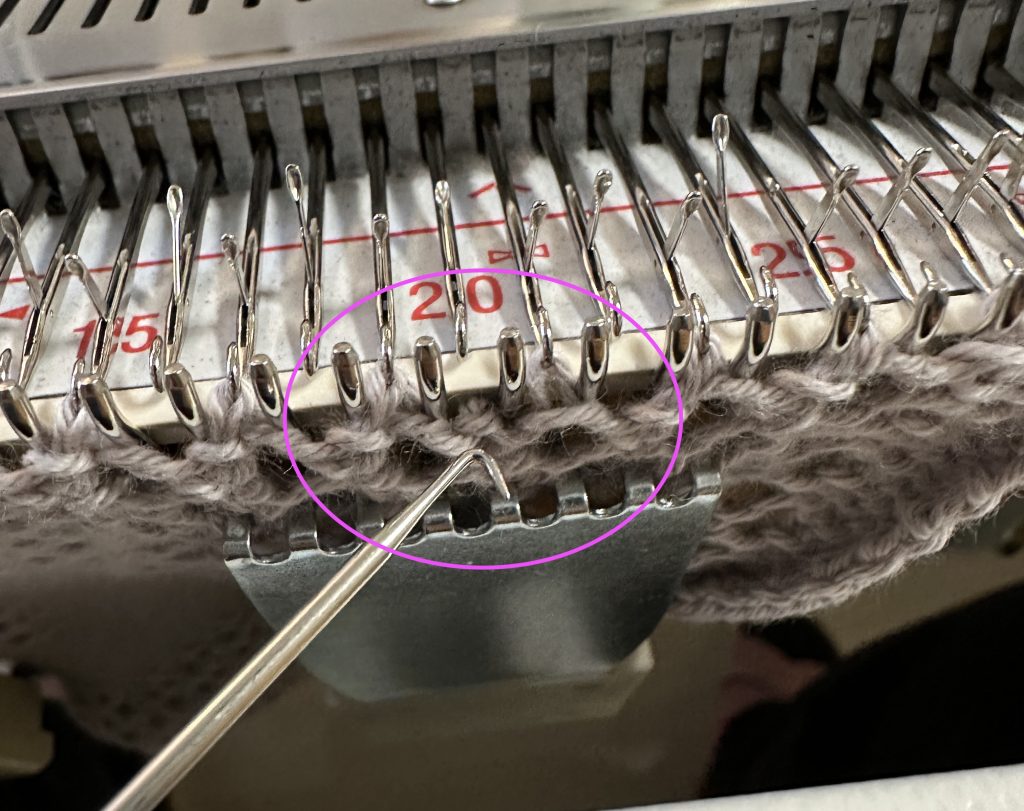
In addition, we had an intense weather change including change of air humidity. While I had absolutely no problems knitting the first try of the letter G, my yarn got stuck in the L carriage during knitting the second square. It was just not sliding so smooth of the needles anymore. With a bit of wiggling of the L carriage the yarn finally slipped BUT I can tell you, if you move the L carriage too much left and right, the punch card will be pushed and the selected row on the punch card is not matching the knitting anymore! Since row counter and punch card are out of sync checking the row number on the counter is not helping in finding back the right row number. If you are stuck, check the punch card number first. Just saying … .
After knitting the lace square I knitted a very plain square in one solid color to place it behind the lace square, later.
Adaptation and hand manipulation
The square, and eyelet lace in general can also be done without a punch card. The eyelet lace pattern is rather straight forward and can be worked manually manipulating the needles, too. To do so, knit two rows and then transfer every second stitch either one stitch to the left or to the right, then knit two rows, and so on. You can use the chart for hand knitting for that. Important is that an eyelet is always placed above a knitted stitch. Therefore, the stitches that are transferred are alternating. Of course, you should not knit eyelets where the letter is placed.
In total, that design is not resulting in the most colorful block of the blanket, but in my opinion, there was already quite some color in the blanket, and second, I really wanted to have some lace in the blanket, too. I like the block as a more neutral part. And of course, the design could be done with more colors (stripes in the bottom square, Fair Isle in the bottom square, stripes in the lace, trying to have the G in a different color, going all crazy).
And what I liked most: I did understand the lace knitting on the brother much more. In the future, I will understand lace punch cards much better than before.
🇩🇪 Wird dran gearbeitet.
🇳🇱 Wordt aan gewerkt.